Indiemark 3 Lens Encoder
|
|
|
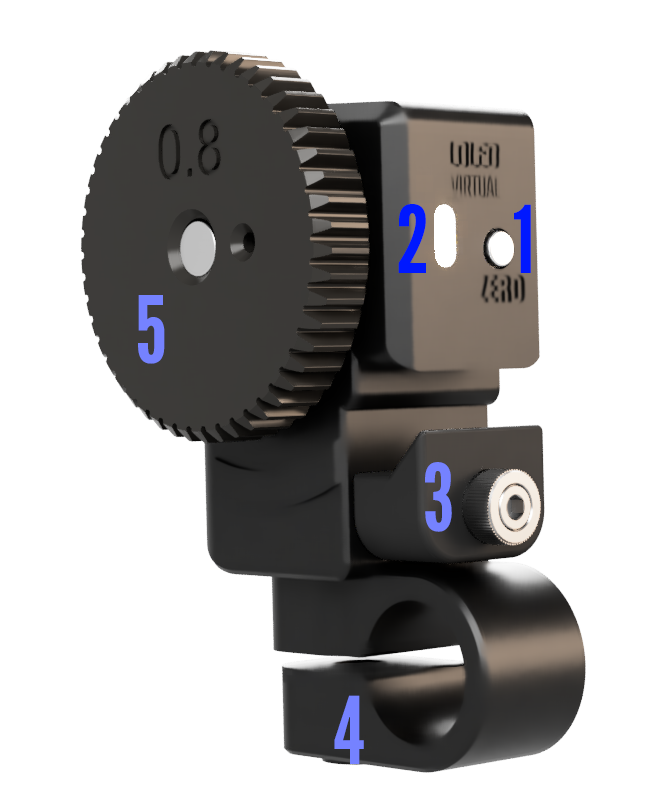
LED Indicator
| Effect | Description |
|---|---|
| Breathing Orange | Power applied, but unable to enumerate USB |
| Pulsing red | Encoder is not zeroed |
| White | Encoder is at or near it's zero point |
| Fading blue | Normal operation |
Physical setup
- Choose the gear that correctly interfaces with your lens. Gears can be replaced by using a 1.3mm allen wrench. The default gear pitch is 0.8mod for cine lenses, but 0.6 and 0.5 are also available for broadcast lenses.
- Select the rod clamp that fits your iris rods (15mm vs 19mm,) and place it over the 1/4-20 thread on the bottom. Tightening the knob will lock the clamp.
When first powered on, the encoder will pulse to indicate it needs to be zeroed.
It doesn't matter which side of the lens you mount the encoders. When you Zero the encoder, it will report positive values no matter which direction it is spun.
- Set the lens to the correct position before zeroing it:
- Focus: Close focus
- Iris: Widest aperture
- Zoom: Widest focal length
- Once set, press the Zero button to zero the encoder. You are now set.
USB Cable Clamp
The integrated cable clamp allows a low-profile right angle USB-C cable to be attached securely. Completely remove the clamp to install the cable. If you want to more permanently affix the cable, the thumbscrew can be further tightened with a 3/32" allen wrench.
The USB clamp is optional and can be removed to allow for different types of USB cables to be used.
Connection and Next Steps
Depending on how you'd like to setup your workflow, there are multiple options for connecting to the encoder.
| Name | Interface | Description |
| LONET Server Software | USB | The LONET 2 Server software is used to detect, manage, map, and output data from Indiemark Lens Encoders. It can be downloaded for free. |
| Encoder 2 Ethernet Box | Ethernet/WiFi | The LOLED E2E box can be used to to send encoder data fia Ethernet or WiFi. |
| Custom | The Indiemark encoder protocol is freely available for anyone to develop with. In addition to USB HID, the Indiemark 3 also presents a standard USB Serial port that can be communicated with very easily. The port simply displays the currently encoder value. |
Indiemark Network Relay
The Indiemark Network Relay utility (built with VPOS) can be used to send Indiemark encoder data via a wireless or wired network, enabling the remote use of Indiemark encoders by plugging them into a Mini PC.
The utility can be started with RUN.BAT. When running, any Indiemark encoders will be detected and sent to LONET 2 via the standard LONET multicast IP. They can then be mapped just as if they were connected via USB.
The utility can be set to start automatically on system bootup. We reccommend the GMKTec NucBox line of Mini PCs.
Using Multiple Encoders
When not using an E2E FIZ, an easy way to connect multiple encoders to one camera is to connect them all to a USB hub, and then run an active USB cable back to the PC.
https://www.amazon.com/dp/B07MFW93B4/ref=cm_sw_em_r_mt_dp_S9MN5324WR8KVF70TX1K?_encoding=UTF8&psc=1
https://www.amazon.com/dp/B07L32B9C2/ref=cm_sw_em_r_mt_dp_RXNN5TPZ0PV8B7DW4AGW
Specs
- Weight: 100grams
- Data rate: 1000hz
- Resolution: 4000CPR
- Power: 5V 100mA
- Port: USB type C (USB 2.0 pins)
- Spindle diameter: 6mm
- Material: PA12 Nylon